Sunday, December 12, 2010

Garlic Shrimp with Basil Avocado Dip

We are lucky enough to have access to locally caught shrimp. The place where we purchase these shrimp, as well as all of our groceries, have high quality standards that make me feel more at ease about the food we eat. I also got some very ripe avocados that were on sale-but needed to be used ASAP. I love to dip shrimp and this basil avocado dip combines creamy and fresh that pairs nicely with the garlicky shrimp. Normally, I would leave the tails on, but I zoned out to my kitchen prep days and took the tails off and didn't realize it until I was almost done. We paired this with a big salad and a glass of Riesling.

What you will need: (serves 4)

1lb large shrimp (20/25s or larger), peeled, deveined, tails on
3 cloves garlic, sliced thinly
Salt and Pepper-to taste
1T fresh parsley, chopped (optional)
Lemon juice-to taste
1t olive oil
2 ripe avocados
2T sour cream
1/2t garlic salt
2T fresh basil, chopped

I allow my shrimp to drain and dry in the colander. If the shrimp are too wet, they will not get that crust on them that you want...you will end up with steamed shrimp, which if that is your thing, go right ahead. Combine shrimp, garlic, salt, pepper, and parsley. Mix until shrimp are evenly coated and let marinate for 15 minutes. Meanwhile, heat grill or skillet to medium high. In a food processor, scoop out the avocados. Add sour cream, garlic salt, and fresh basil. Pulse until creamy. (This can also be done in a bowl with an immersion blender or a potato masher.) Add shrimp in a single layer to the grill or skillet. Cook until pink on the side and opaque as you look towards the middle of the shrimp. Flip and continue to cook until the shrimp has just turned opaque on the inside-don't overcook them! Serve hot with the dip.

Saturday, November 13, 2010

Brats with Cheddar and Warm Apple Slaw

About once a week or so, we like to have a fun food night, food that is good to eat with your hands while watching a good movie. Sometimes I will make wings, pizza, or just have cheese and crackers. This is a great fall fun food recipe. I bought all natural brats (no MSG, gluten, nitrites, nitrates, yadda yadda), cooked them up and melted sharp cheddar on them and served a warm local cabbage and apple slaw on top. It.Was.Killer.

What you will need (makes 6)

6 All-Natural Brats, either pork or chicken
Ceddar Cheese, enough to cover brats
6 Hotdog Buns
1t vegetable oil
1/2 head of green cabbage, thinly sliced
1 carrot, julienned
1/4 onion, thinly sliced
1 apple of your choosing, thinly sliced (I used Honeycrisp)
1T apple cider vinegar
1/4 caraway seeds
Salt and Pepper to taste

In a skillet over medium heat, add brats and cook until brown. Flip and start cooking on other side. Push the brats to one side and add the oil to the pan. Add cabbage, carrots, onions, and apples. Cook, tossing occasionally until the onion begins to soften. Add the caraway, cider vinegar, salt and pepper. Add the cheese to the brats. Reduce heat to low, cover, and continue to cook until cheese is melted and the vegetables are slightly soft, but still crunchy. Serve in a toasted bun.

Thursday, November 11, 2010

Bacon Wrapped Apples with Blue Cheese

This yummy little treat is a perfect hors d'oeuvres or serve a few on top of mixed greens with a balsamic vinaigrette. They are very easy to make; the sweet/salty/creamy combination is perfect for the fall.

What you will need: (makes 10)

1 sweet, firm apple (Honeycrisp, Fuji, Gala)
5 slices of bacon
pinch of ground cinnamon
4 oz good quality blue cheese*

* I used Rogue Creamery's Oregon Blue. Basically, use any blue cheese expect the crumbles.

Cut the apple into ten equal slices, make sure the core is removed. Cut the pieces of bacon in half. Wrap the bacon around the apple and sprinkle with cinnamon. Heat a skillet over medium high heat. Place the apples bacon seam side down. Cook until the bacon is done, flip and continue cooking. Once the bacon is done, remove from the pan and add blue cheese on top.


Tuesday, November 9, 2010

Spicy Roasted Butternut Squash Soup

In my first semester of culinary school, I fell in love with making soups. I loved the entire process, making stock to have on hand, making sure all other ingredients were sized to fit on the spoon, the smell of mirepoix sauteing, seasoning layer by layer, and slowly adding cream as to not curdle it. The thing is, I was damn good at it too. I always told myself, that if I end up in a classic French brigade de cuisine, I would be a Saucier (one who is in charge of sauces and warm hors d'oeuvres...another one of my favorite things to do) or a Potager (soup maker). When the weather starts getting cold, I can live off of soup. This is one of my favorite fall soups. Local butternut squash, spicy sausage, and a splash of cream to balance the two, this soup makes me want to put on fuzzy socks and curl up on the couch. I typically make a double batch and freeze in serving size containers. Makes for an easy, ready to go meal.

You will need:
1 butternut squash, about 2 pounds
2T olive oil
1c onion, small diced
1 1/2t garlic, minced
1/2c carrot, small diced
1/2t ground cumin
2 c low sodium vegetable stock*
1/4c heavy cream
3 links spicy sausage, such as spicy Italian, andouille, or chorizo**
Salt and Pepper to taste

*For the love of Julia, always use low to no sodium stocks, you can always add salt
**You can use pork or chicken sausage, I used a spicy Italian chicken sausage.

Preheat the oven to 400 degrees. Cut the squash in half and drizzle lightly with olive oil, and season with salt and pepper. Place on a sheet pan, cut side up and roast for 40-50 minutes. Allow the squash to cool to the touch. In a large sauce pot, heat the oil on medium heat. Add the onion, carrot, and garlic, and cook until the onion begins to brown. Add the cumin, salt, pepper, and scoop the squash into the pot. Add stock and simmer for 15-20 minutes. Meanwhile, in a frying pan, add the sausage. Cook until done and either chop finely with a knife or pulse until fine in a food processor.When the soup is done, blend together with an immersion blender (or in batches in a food processor). Puree until smooth. Fold in the sausage and slowly add cream. Season with salt and pepper.


Halloween Meatloaf Fun

Man, I am a bad food blogger! I swear, I have cooked in the past 3 months! For Halloween, I made these meatloaf hands. I got the idea from notmartha.com (great website). They used a hand mold to sculpt the shape, but I just did it by hand. I used my standard meatloaf recipe, which you can change to a turkey loaf, added onions for the fingernails and wrist bones and added provolone cheese to create the burnt skin look. Tip: always pull your meat out 5-10 degrees cooler then what you want it to be, it will continue to cook as it rests. Also, you can hide imperfections in the shape of the hand by piping mashed potatoes around it.

Meat Hands (makes 2 hands)

1 cup panko breadcrumbs
1/3 cup whole milk
1 medium onion, finely chopped
3 garlic cloves, minced
1 medium celery rib, finely chopped
1 medium carrot, finely chopped
2 tablespoons unsalted butter
2 tablespoons Worcestershire sauce
1 tablespoon cider vinegar
1/4 teaspoon ground allspice
4 sliced of bacon, diced
1 1/2 pounds ground beef chuck
1/2 pound ground pork
2 large eggs
1/3 cup finely chopped flat-leaf parsley
1 onion
4 slices provolone cheese
1/2 cup ketchup

Preheat oven to 350°F with rack in middle. Soak bread crumbs in milk in a large bowl. Meanwhile, cook onion, garlic, celery, and carrot in butter in a large heavy skillet over medium heat, stirring occasionally, 5 minutes. Remove from heat and stir in Worcestershire sauce, vinegar, allspice, 2 teaspoons salt, and 1 1/2 teaspoons pepper. Add to bread-crumb mixture. Add bacon to onion mixture along with beef, pork, eggs, and parsley and mix together with your hands. Shape into 2 hands. Slice onion into a fingernail shape and attach to the meatloaf. Spread ketchup on the top of the hands. Tear provolone and cover the entire meat hand, except the fingernails. Bake for about 45-50 minutes or until the internal temperature is 160 degrees. Let rest for 5 minutes before serving.

Friday, August 13, 2010

Stone Fruit Sangria

I have been munching on local peaches and nectarines constantly for a month now. Sometimes I have two or three a day. They have been major juice bombs, and basically, I have been making a huge mess eating them. My neighbor and I have a tradition of making Sangria on our movie night. Typically, I would use oranges, grapefruit, lemon, and lime, because I love citrus fruits so much. With my latest obsession with these local nectarines and peaches though, I decided to make my sangria with them. I also added some fresh cherries that I had in the fridge....and where as they are not local, I am enjoying them while they are in season. I used white wine, but you can certainly use a red. I would personally use a Pinot Noir.

What You Will Need:
1 bottle of a lighter white wine (I typically use a slightly sweeter Riesling or Pinot Grigio)
1 nectarine, pitted and sliced 1/4" thick
1 peach, pitted and sliced 1/4" thick
10 cherries, pitted and halved
1/3c brandy (I used Korbel)
1/3c orange juice

Place your fruit in your pitcher that you will be serving from. Add the brandy and orange juice and marinate for 30 mins. When you are ready to serve, pour your wine into the pitcher. I serve mine in a wine glass with ice.

Thursday, August 12, 2010

Bison Meatloaf

I'll have to admit, I love meatloaf. My mom made great meatloaf growing up, so I was never scarred from a dry, unflavored meat block. I have stopped buying beef for quite a while now. Occasionally I will buy Bison instead; packed with flavor, iron, and leaner than the leanest of beef. The thing I like about Bison is that no matter how much you cook it, it is still tender and juicy. Bison to me is also not gamey. Here is my meatloaf for 2 (with lunch the next day). I packed it full of crimini mushrooms, red onion, and served it with homemade mashed potatoes and garlic sauteed spinach (and pinot noir).

What you will need:

1 pound ground bison
1 1/2c crimini mushrooms, small diced
1c red onion, small diced
1T fresh sage, chopped
1T fresh thyme, chopped
1 egg
3/4c tomato sauce, divided
1/2c breadcrumbs*
1/2t salt
1/2t black pepper
1/4t dried crushed red pepper flakes

* I highly recommend panko bread crumbs. If you are like me and have to use gluten free bread crumbs, add a little extra.

Preheat the oven to 375. In a medium skillet, heat 1T of olive oil over medium heat. Add onions and mushrooms. Saute for about 5 minutes. This will remove the water from the mushrooms and leave the onions translucent and tender. Remove from heat, add sage and thyme, and cool slightly. While that is cooling, in a bowl, mix the bison, egg, breadcrumbs, 1/2c tomato sauce, salt, and pepper. Shape into a roughly 6x3 loaf and place it in a baking pan. Place in the oven for 30 mins. In a small bowl, combine the remaining 1/4c tomato sauce with the red pepper. Pour over the meatloaf. Continue to cook for 20 minutes longer. Rest for 5 minutes.

Wednesday, August 11, 2010

Moroccan Harissa Chicken with Roasted Red Onions and Chickpeas

Ok, first off...The lighting fixture went out in my kitchen a couple of days ago, and I have been waiting on a new one that has been ordered. Cooking in the dark is a little bit of a pain, so please excuse the crappay photos.

Anywho, I bought some local whole chicken legs that were on sale. This recipe would work well with a white fish (such as tilapia), salmon, pork, or big chunks of vegetables (like eggplant, squash, potatoes). Harissa is a North African paste made from Piri Piri chili peppers, tomatoes, and paprika. It has a wonderful sweet and(very) spicy flavor. I bought a prepared bottle of Harissa from Whole Foods Market and altered it a little.

What you will need:

2 1/2 pounds chicken legs (about 4)
1/3c prepared Harissa paste
1/4c plain Greek Yogurt
1T lemon juice
1 can chickpeas, rinsed and drained*
1 red onion, diced very large
1t olive oil
Salt and Pepper-to taste

Preheat the oven to 425. Mix Harissa, yogurt, and lemon juice together. Pour over chicken legs and marinate for 1 hour at room temperature (yes, it's ok). In a bowl, add the chickpeas and red onion. Drizzle olive oil, toss, and season with salt and pepper. In an even layer, place chickpeas and onions in a baking dish (one large enough to eventually put the chicken in). Roast for 10 mins. Remove from oven and lay chicken legs on top of the chickpeas and onions, skin side up. Put back in the oven and continue to cook for 40 mins.

My fiance and I loved this. The yogurt toned down the heat a little, the lemon brightened, and the chickpeas had a slight chew and were packed with flavor. Honestly, I will probably roast chickpeas as a snack in the future.


I served it with wild rice that I cooked according to package, then added 1t onion powder, 1t garlic powder, a pinch of ginger, and 1/2c of raisins. I also sauteed some zucchini.

Thursday, July 8, 2010

Blueberry Balsamic Sauce

I recently visited a berry farm here in North Carolina. They use high tunnel technology to grow strawberries, blueberries, raspberries, and blackberries under a more controlled environment. These tunnels also allow the farm to produce berries earlier then when they would normally be harvested. During the summer, blueberry is king here. They are sweet, juicy, and full of flavor unlike what cooks call "water bombs". Here are a few pictures from the farm:

These tunnels originated in Spain on raspberry farms. The raspberries were getting damaged from rainfall so farmers built these protective coverings. They also keep heat inside which is how they can produce berries earlier.


You can tell what kind of bee pollinated the flower. Regular bees will go up into the flower, whereas carpenter bees go through the side. You can see the marks on the side of the flower.


So here is my recipe for Blueberry Balsamic Sauce. Sweet enough to be heavenly on vanilla ice cream, pound cake, or crepes. Savory enough to go along with roasted chicken or pork, as well as silly easy to make:


You will need:

1 cup balsamic vinegar

1/2c cup sugar

1 pint blueberries

1 cinnamon stick

Bring the sugar and vinegar to a boil. Continue to boil for about 3 minutes. Add the blueberries and cinnamon stick. Return to a boil and cook for about 5 minutes. The sauce will have thicken and turn a deep purple. Serve warm or at room temperature.

Sunday, April 11, 2010

Braised Local Beef Short Ribs

Woah, it has been a long time since I have posted anything. Winter months are difficult to find local products. Like I said, there are only so many sweet potatoes I can eat! But now Spring is full in effect and I couldn't be more excited about local berries, tomatoes, and meats!

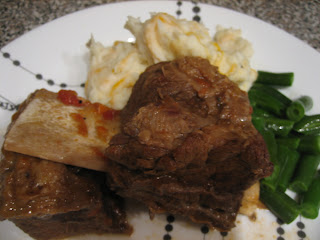
I wanted to make a special comfort food dinner and was able to snag some short ribs. I remember a fine dining restaurant I worked in made short ribs when they were available. They were packed with flavor and melted in your mouth. When I went to the meat case there were no short ribs to be found. However, I was always told in culinary school and from chefs to make friends with your butcher. So I asked my friendly butcher if he had any and he was able to cut me some right then and there!

Short ribs is to beef as spare ribs are to pork, but much more tender. Short ribs are also a relatively inexpensive cut of meat as well. Mine were $5.99lb, Grass-fed, and best of all LOCAL! I think back to the restaurant and say "Wow, we charged about $28 for an order that had two ribs, mashed potatoes, and vegetables" So here is an easy braised short rib recipe

Serves 2 with leftovers for lunch the next day
2 1/2lb short ribs, bone in
1T steak seasoning (I use Borsari)
2T vegetable or canola oil*
1c onion, medium diced
1/2c celery, medium diced
1c tomatoes, seeded and diced**
3 cloves garlic, sliced
2T Worcestershire sauce
2bay leaves
1/2 red wine vinegar or a medium bodied red wine***
1quart beef broth****
Salt and Pepper to taste

*Do not use olive oil, you need to get your pan smoking hot...olive oil doesn't like it
**I used local fresh tomatoes, but if you can't find good tomatoes, used a no salt added canned
***If it is a yucky wine, you will have yucky short ribs...
****Always use low sodium broths, take control of the salt level!

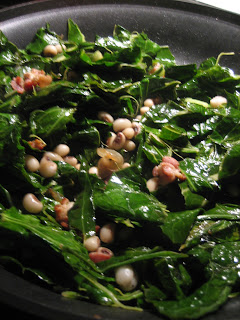
Season short ribs with steak seasoning. Pat into the meat with your hands. In a large pot, heat oil until very hot. Sear ribs and turn until a brown crust forms on all sides of the rib (Crust is crucial. Don't worry, you aren't trying to cook the meat, only searing it). Remove from pan. Add your celery, onion, and carrots (It's called mirepoix "Mear pwa"-use it and sound smart) and cook until slightly tender. Add garlic, tomato, vinegar (or wine), Worcestershire sauce, and bay leaves. Add short ribs back to the pot on top of the veggie mixture. Pour enough beef broth to slightly cover the ribs. Simmer for 2 1/2 hours.


Saturday, January 2, 2010

New Year Collards and Black Eyed Peas

Growing up in the South, every year on New Years Day, I was subjected to eating collard greens, black-eyed peas, cornbread, and rice in hopes of accumulating wealth in the new year. This was the most painful meal of the year. The greens were boiled to death as well as the peas, and I was scarred for life. I grew up hating greens and basically every green vegetable besides green beans and asparagus. When I was in culinary school, I discovered how much I loved sauteed spinach. I started experimenting by sauteing other greens and grew to love them. Now, I get cravings for them...cannot eat enough. For New Years I decided to fall in with tradition and make a fresh tasting collard green dish. The collards I found are not only organic, but local and inexpensive as well. I have also made this and tossed in cooked pasta noodles for a complete dish. Hopefully it will bring me a little extra wealth this year...

You will need:
2 bunches collard greens, center ribs removed and torn into medium sized pieces*
1c black eyed peas**
1 clove garlic, minced
1 small shallot, thinly sliced
3 slices of bacon, cut into small pieces (you can leave this out, just increase olive oil by 1T)
2-3T of red wine vinegar
olive oil
salt, pepper, and crushed red pepper flakes to taste
Parmesan cheese

* To remove ribs, fold the green in half, lengthwise, and holding the stem, pull the leaf away.


**You can used canned or fresh, I used fresh and boiled them for about 30 minutes until they were tender.

In a pan over medium heat, render bacon until almost done. Add garlic, shallot and 1T olive oil. Saute until bacon, garlic, and shallot are cooked. Add collard greens and peas. Add vinegar and turn greens so they can wilt. Add enough olive oil to lightly coat the greens. Continue cooking until tender, about 5-6 mins. Season with salt, pepper, and red pepper flakes to taste. Serve with Parmesan cheese on top.

Fried Rice, the Ultimate Fridge Cleaner...

Throwing away produce is a shame, not to mention expensive. Whenever I have a bunch of vegetables that I need to use up I like to make fried rice. Making your own fried rice is easy and is healthier then ordering it from your local take out. You will typically use fresher ingredients as well as less fat and salt that are in typical restaurant dishes. During culinary school, I really started to notice the taste of salt in food and how to properly season foods. When you learn this, you use much less. There is no set recipe for this, so get creative! In the fried rice I made, I used cabbage, broccoli, carrots, corn, spinach, onion, bell pepper, peas, and egg. Use whatever you have! Be adventurous and add pineapple or oranges. Add cooked meat, tofu, or tempeh for added protein. It is the ultimate way to clean out your fridge.

You will need:
1c rice
1 egg
3T vegetable oil
chopped garlic
soy sauce
1t sesame oil
sesame seeds
vegetables
meat, tofu, or tempeh (optional)

A easy way to remember to cook rice is 1 part rice to 2 parts water. Boil water and add rice. Cook covered for 1o mins and then uncovered for 10 mins. In a large pan, heat oil over medium high heat. Crack egg in the pan and as it cooks, break it up with a spatula. Add veggies and saute until tender. Add cooked rice. Cook for 2 minutes and then turn rice over with the spatula. Add sesame oil, soy sauce, and sesame seeds. Mix until the sesame oil and soy sauce coat the rice.